Speedrunning With Director's Cut (Solo)
Loadout
Cards: Evade / Kaboom! / Twist of Fate / Explosive Touch / Raining Bullets
Weapon variants
Dominion Variant - Kendall 44 -> Accquired through Multiplayer
Warden or Sunburst Variant - Titan -> Accquired through 500 Salvage or QuartermasterThese variants can be accquired through the method mentioned or Scrappy's Unlock Tool which can be found here:
Freckleston's Discord -> https://discord.gg/2SnakvEpwP
Character
Starting with Willard Wyler is the fastest. Willard spawns in with a melee weapon, which gives you slightly faster movement speed when held. You can still speedrun this map with other characters if you haven't unlocked Willard, but you'll have to either accept the slower movement or buy the oni off the wall during the run (to the left of Neil's head) which also gives you a slight movement buff.
Early game
In this part, you're getting your wonderweapon, opening PaP, retrieving the seti-parts and ending round 1.
Wheel locationsWhen you spawn in, locate where the magic wheel is. Hitting the wheel for a wonderweapon as early as possible will keep your reset times down. Your early game routing will depend on where the magic wheel is.
- Kepler wheel: This is the optimal wheel location. Run up to the wheel through Kepler, and after aquiring the wonderweapon drop down and start with the Polar portal, before opening the rest of the map.
- Polar wheel: This is the 2nd best wheel location. Run up to the wheel through the Astrocade, and after acquiring the wonderweapon, go up and start with the Polar portal, before opening the rest of the map.
- Journey wheel: This is the worst wheel location. This wheel is very unique because there are two ways to play it, either you can play for the slightly faster strategy but longer reset which makes you run through Keplar, turn on the power, run to Polar, turn on the power, and start with the Polar Portal, then once you get out run straight through the Astrocade to hit the box, OR the faster reset which is run straight through the Astrocade and hit box, afterwards you go through bumper cars and turn on the power and go through the portal, then do the opening sequence as per usual.
Seti parts
Whilst you are opening the map and going through the 4 portals, you'll have to pick up the 3 seti-com parts:
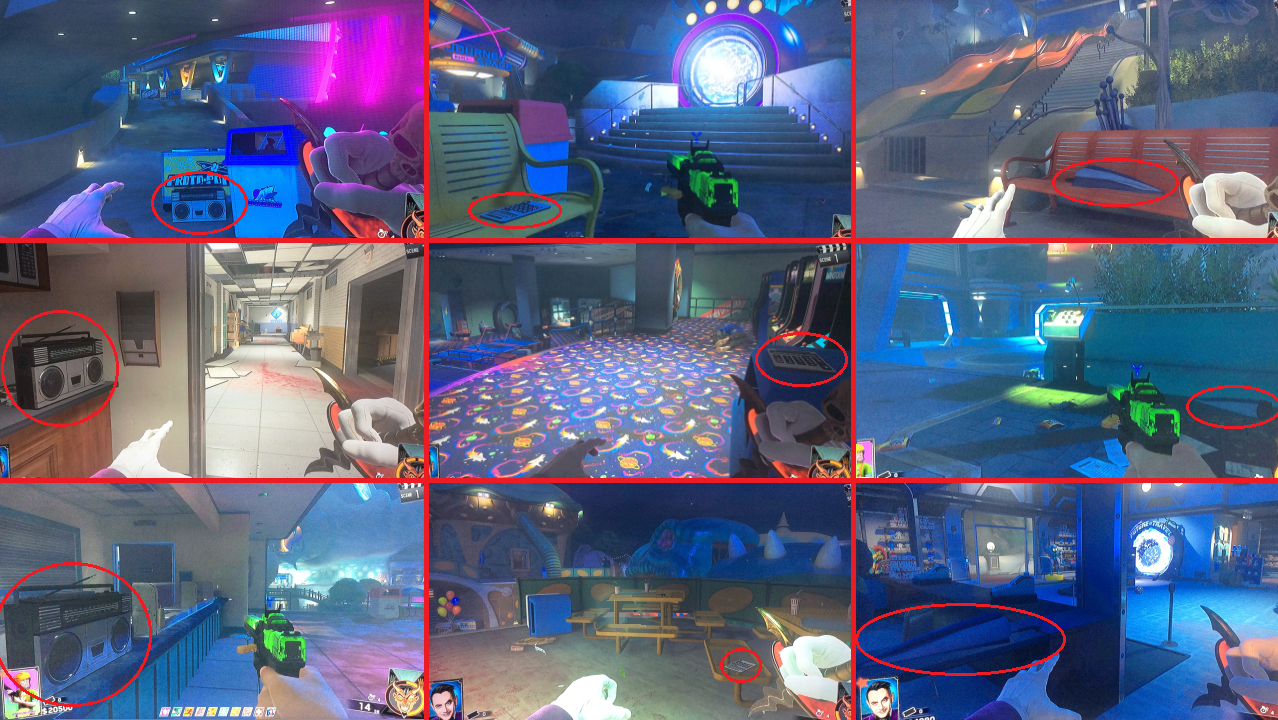 There are 3 part regions, indicated by the 3 rows on this picture. You will only get one part per spawn region. So, when you find a part in a specific region, you know there won't be another one in the same region, and after finding two parts, you'll know exactly where the third one is.
Notes: It is best to pick up the calculators inside of the Arcade and Kepler as the portal is charging up. It is best to pick up the umbrella behind the portal directly after pack-a-punching. The boom-box in basement is the worst part to get and it is best to pick up before opening up journey, or after pack-a-punching.
As you are opening the map, remember which of the DJ booths is active and use your evade as soon as you get it. You can open extra doors on your way to get evade as early as possible. Money is not an issue if you get the wonderweapon from one of your first couple hits.
Packing
Hop into the pack-a-punch as soon as it is unlocked and pap your kendall. This should give enough charge to pop your nuke to end the round. You want to pop the nuke as early as possible, but keep in mind that you will need to have entered pap and acquired all 3 seti parts before 7 seconds have passed into round 2. This does give you some leeway to grab any parts you still need after dropping the nuke.
After these 7 seconds have passed into round 2, you can go and talk to the Hoff at the active DJ booth, which will give you the seticom. do NOT talk to the Hoff before the 7 seconds have passed, as this will soft-lock your game. An in-game indication of this timer is that the lights on the UFO in the mountain will turn off and then start blinking when these 7 seconds have passed.
Note: Dropping a nuke to end the round is less reliable than you'd expect for round 1. If the nuke goes off during a brief zombie-respawn-interval, it will not end the round. I don't know which times to avoid, maybe a coder can find out. If the nuke fails, go out and end the round naturally or reset.
Playability
How often you reset depends greatly on the time you are aiming to get.
If you are new to the run or just want to get a decent time, I'd recommend only resetting if your wheel moves or if you run out of money, and let the late-game determine your resets.
If you are running for high leaderboard placements, it is time to start resetting more. I would recommend dropping games where it takes longer than 3 hits to get the wonderweapon, drop games with Journey wheels (not neccessary with the slower reset strat), drop games with boom box in the basement and drop games with Hoff at Polar.
If you are running for WR, heaven help you, time to reset for almost anything sub-optimal.
Mid game (seti-coms)
Seti-coms are random, with one major exception: You are guaranteed to get a seti-com defend in the basement. This fact shifts the odds and thus, prefered pathing options. Whether you will get basement 1st, 2nd or 3rd is random.
Seeing as the seticom must appear downstairs in one of the three instances, there is a 33.3% chance that it will be downstairs for 1st seti. The other 6 seticom locations evenly fill up the 66.7% chance which is left, so each location with an 11.1% chance. Start your first seti search by checking the location(s) closest to Hoff and then include going to basement early into your pathing, as to maximize the odds of finding it early.
For the 2nd seti, start your search in the basement if you haven't gotten this location before, as there is now a 50% chance of it being in the basement. A recommended pathing for 2nd and 3rd seti goes as follows: Basement -> Journey -> Bridge -> Gift shop -> Fountain -> Kepler ORBridge -> Basement -> Journey -> Bridge -> Gift shop -> Fountain -> Kepler Bumpercars is not included because it is too far away and thus often a reset when you get it. But nothing is stopping you from coming up with a different path which does include it. If you did not get the seti downstairs on the 1st or 2nd seti, it is now guaranteed to be downstairs for the 3rd seti. Otherwise, use the usual pathing.
Round flips
You will have to end the round after each seti-com defense. A good way to get through this is by standing on the bridge behind the PaP portal. Zombie spawns are the same rate everywhere and killing fast will not make them spawn faster (unless you hit the spawn cap). No, in this case it is all about finding the final couple zombies as fast as possible, and the zombie spawns at the bridge are clear and visible from one place. It is recommend to kill zombies as you are running around looking for setis, because the kills you get before the seti defence, will reduce the amount of kills you'll need after to end round.
Notes: Keeping the seti-com on the ground after the defence will make every zombie sprint, which can help with round flips. Just make sure you pick it back up before the new round starts, or before the round on which you get the speakers if you keep the 3rd seti on the ground. Sometimes, it will take a while for the final zombie to spawn in. This happens when you get a spawn inside of a window on your way to the bridge. Zombies inside of boarded windows cannot respawn until they've removed all the windows and jumped out, which can take forever. The window next to the escape velocity trap in Journey is infamous for this occuring.
Late game
This part includes obtaining the speakers and the bossfight.
Speakers & Clowns
You will be finishing your third seti on round 4. The speakers will be available for pick-up on a zombie round, after one full zombie round has passed. Let's go over the 3 possibilities:
- Round 5 clowns (worst case): Stay on the bridge to end the clown round and the round 6 zombies round. Then run out to find Hoff when round 6 ends. The speakers will be available on round 7.
- Round 6 clowns: Stay on the bridge to end the round 5 zombies. Run out to Kepler when 5 ends. Stand on the stairs going up to Kepler power to end the clown round (clown spawns are good here). Run out to Hoff when the clown round ends (take the Kepler portal if he's not at Kepler or Polar). The speakers will be available on round 7.
- Round 7 clowns (best case): Stay on the bridge to end the round 5 zombies. Run out to Kepler when 5 ends to look for the Hoff (take the Kepler portal if he's not at Kepler or Polar) The speakers will be available on round 6. If you're running for high leaderboard placements, you will have to reset if you don't get round 7 clowns
Use your twist of fate at any point to help with round ends.
Notes: as far as I know, the Hoff's location at this point can not be predicted based on his location earlier in the game. Sometimes, the DJ booth may be open, but the Hoff is not in there. This is a glitch, the Hoff is at a different location. Look at whether or not the "Cosmic Tunes" sign above the booth is lit up, as a consistent sign of knowing if he's there or not.
Bossfight
The colors of the speakers in the bossfight depends on the order in which you place them down. The first speaker you place will be yellow, then blue, then green, and finally red. You'll usually see people place them starting in front of PaP and then going clockwise. This results in the following: PaP = Yellow / Journey = Blue / Polar = Green / Kepler = Red. But there's nothing stopping you from trying a different set-up.
The Simon Says sequences are straight-forward. There is some RNG involved in how fast the UFO returns for the next sequence.
Around 10-20 seconds into the clown phase, use your explosive touch and start building charge for your infinite ammo. Pop your infinite ammo as soon as the final clown has died and start shooting at the alien. The upgraded wonderweapons become full auto when an infinite ammo is active so you can hold down the trigger. When the alien goes down, stand to the front-right of it and melee the backpack which it tilts to the right. Back away from him after succesfully punching it to avoid the blast and start shooting as the alien gets back up.
Shooting down the UFO also requires luck. As far as we know, there is no manipulating its movements. The time ends the moment the UFO crashes into the mountain.
Optimization
Ticket stalls
Keep your eyes peeled for the items within the ticket stalls as there are some useful items in there, especially the transponder and portal grenade. You can use these items to save time by teleporting around in between seti-coms, or, more often, after grabbing your speakers from the Hoff. You can obtain tickets from placing Neil's head and completing challenges or from a backpack. The armaggedon item can help you with ending rounds.
Submit Edit
Do you have a ZWR profile?
Contributors
Original Contributor(s)
Other Contributors